You can build a complete golf simulator for $1,000 to $2,500 by buying components separately instead of overpriced packages. Start by measuring your space; you'll need at least 10 feet wide, 15 feet deep, and 8.5 feet tall for clearance. The fundamentals include a hitting mat ($35-$349), an impact screen or net, and a launch monitor like the PRGR at $229 or the Garmin R10 at $600. Build your own enclosure frame with EMT conduit pipes for under $200, then connect everything to a decent PC with basic specs to get started this weekend.
Before you drop a few thousand dollars on fancy golf simulator equipment, you need to grab a tape measure and get serious about your space. The reality is, most people skip this step and end up with a $5,000 paperweight in their garage.
You'll need at least 8.5-9 feet of ceiling height for basic swings, though 10 feet is way better if you're swinging drivers. Width-wise, aim for 10-12 feet minimum, but 14-15 feet lets both righties and lefties practice comfortably. For depth, you're looking at 15-18 feet total, that's 10-12 feet from your hitting area to the screen, plus a couple of feet behind you for the projector and launch monitor to work properly. Don't forget to leave 6.5 feet of open space around your hitting mat for safe movement and to prevent your club from smashing into walls or furniture during your swing.
Make sure you account for the clear hitting zone when measuring, as this is absolutely crucial for a smooth, frustration-free experience.

Once you've confirmed your space works, you can start shopping for the actual gear, and here's the good news: you only need three core components to get hitting balls.
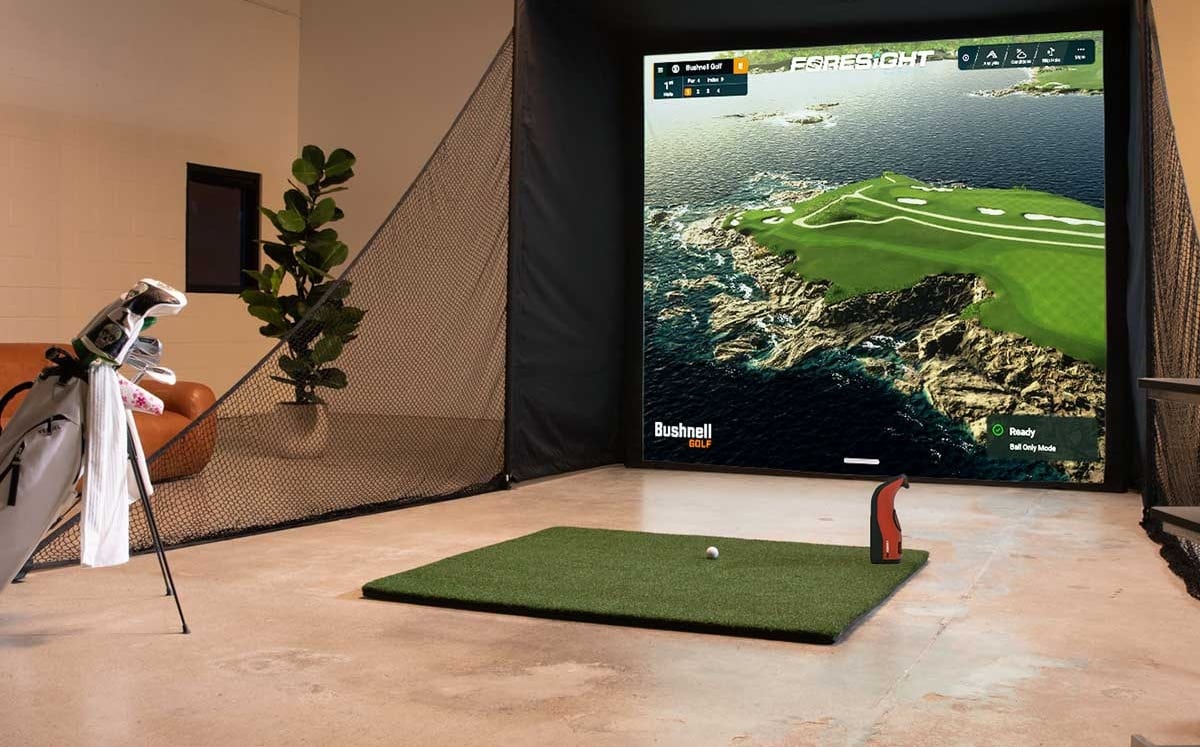
First up, you'll need a hitting mat to protect your floor and give you a realistic surface. Carl's budget-hitting strip runs just $35, while better options like the Big Moss High Impact Mat cost around $349. Consider interlocking gym tiles as a stable base underneath your hitting strip to save money on the stance area.
Next, grab a net or screen to catch your shots. A basic 8x8 ft net keeps things under budget, or you can spring for an impact screen if you want projected visuals later.
Finally, you'll need a launch monitor to track your shots. The SLX hybrid mini monitor works great for tight budgets, while a used Garmin R10 delivers serious data for around $420. You'll also need a phone, tablet, or PC to operate the launch monitor and view your shot data.
Your launch monitor is where you'll spend most of your budget, and it's honestly the most essential decision in your whole setup. Under $500, the PRGR at $229 gives you solid basics, carry distance, swing speed, and ball speed in a tiny 125g package. If you've got $500-$1000, here's where it gets interesting. The Rapsodo MLM2PRO at $699.99 combines Doppler radar with dual cameras for the best accuracy under $1k, plus you get 240fps impact video. The Square Golf monitor, also $699.99, uses high-speed camera tech that rivals those expensive $10,000 units. For simulator fans, the Garmin Approach R10 at $599.99 connects seamlessly to most software. Want maximum features without a smartphone? The Swing Caddie SC4 Pro packs everything into one screen.
If you're ready to step up to the $1,500-$2,000 range, the FlightScope Mevo Plus ranks as one of the most accurate options available and comes without subscription fees, making it more cost-effective over time compared to competitors with annual charges.
A simulator enclosure sounds like a massive project with a likewise massive price tag, but the point is, you can actually build a solid frame for way less than you think. You'll need eleven 10-foot lengths of 1" EMT conduit pipes from your local hardware store, which runs about $210 total. Add corner fittings and splicers for $65, then grab foam pipe insulation for around $50. Throw in tube clips at $18, and you're looking at roughly $343 for the structural bones. The key point is: you're still under $200 if you skip the enclosure wrapper and screen initially, focusing just on the frame using seven pipes at $130, fittings, and basic clips. You can always add components later once you've confirmed everything fits your space perfectly. The entire assembly process takes 30 minutes or less, making this one of the quickest DIY projects you'll tackle for your home golf setup. Once your frame is built, you can enhance it with complete blackout coverage using a RipStop Black Wrapper to eliminate any gaps and create a professional appearance.
Setting up the digital brain of your golf simulator doesn't have to drain your wallet, and connecting everything properly makes the difference between a smooth experience and a frustrating mess.
You'll need a PC with at least an Intel i5 processor and NVIDIA GTX 1060 GPU, which handles both simulation software and projector output. The important point is: your GPU does double duty, processing launch monitor data while sending video signals to your projector.
Start by connecting high-quality HDMI cables from your PC to the projector; cheap cables cause signal drops. Make sure you've got two 110V outlets within six feet of your computer area for safe operation. Once everything's plugged in, adjust your computer's display settings to output a 4:3 aspect ratio, which your simulation software needs for proper screen coverage. Your projector should deliver at least 3000 lumens for a crisp image, even in rooms with ambient light. You can also use a monitor off to the side instead of a projector, though it's less convenient for tracking your ball flight.
Once you've got your digital components sorted, converting a spare room into a fully functional golf simulator takes just two days if you plan it right. Start Saturday morning by installing your frame using 1 ½-inch slotted angle iron from the hardware store; they'll even cut it to your exact measurements. Next, stretch your impact screen tight using bungee ball cords through the grommets, then finish with carpet trim around the edges. Sunday's easier: lay down your turf flooring (some complete setups take under 30 minutes), mount your ceiling projector, and dial it in; that's roughly 7.5 minutes of adjustments. Before you begin swinging, conduct a swing clearance test using your longest club to confirm you have adequate space around your hitting area. Finish by calibrating your launch monitor with test swings, and you're ready to play by Sunday afternoon!

You can use your garage with low ceilings, but it depends on your height and the clubs you'll use. If you've got 9 feet of clearance, most golfers under 5'8" can swing comfortably. At 8.5 feet, you're limited to irons and wedges only. Here’s the situation: grab your driver and test your swing initially! Just make sure you've got 6 to 12 inches above your swing's highest point.
You'll want to keep your simulator room between 65-75°F for the most accurate readings. The fact is: temperature swings mess with ball flight data more than you'd think. At 40°F in a cold garage, you'll lose half a club of distance with irons compared to warmer conditions. The key is consistency; set your thermostat to the same temp every session so your numbers stay reliable and comparable.
Yes, you'll need proper lighting to prevent shadows from messing up your screen image. The trick is positioning your lights sideways using track lighting instead of pointing them straight at the screen. Go for directional LED spotlights with a 20–30° beam angle, install at least two on an H-track so you can easily adjust them. Clear the space between your ball and screen, then add subtle ambient lighting to keep things even without washing out your projector display.
You'll want to protect high-risk zones with foam panels or rubber mats. Focus on the area 8–10 feet forward on your low-right wall, that's where most mishits land. Use 2-inch padding near the impact zone, tapering to 1-inch farther out. Secure foam puzzle mats with industrial tape or lean covered OSB panels against walls. Don't forget your left wall and ceiling above the projector, even though they're hit less often!
Yes, you can definitely relocate your simulator! Most setups are surprisingly portable. Floor-mounted projectors and modular components make reassembly straightforward in your new space. You'll want to plan for a two-person effort when moving larger enclosures. The key is choosing equipment that breaks down easily, like retractable nets and foldable mats. Just make sure your new room meets minimum dimensions: 12 feet wide, 20 feet deep, and 10-foot ceilings for comfortable swings.
You don't need to drop $10,000 to get a solid golf simulator in your home. By measuring initially, focusing on the three fundamentals, and choosing budget-friendly options, you'll save thousands while still getting quality practice. The whole setup takes just one weekend, and you can always upgrade later. Start with what you can afford now, and you'll be hitting shots indoors before you know it!